Federated API Gateway Deployment: Using WSO2 API Manager to Federate API Deployment to AWS API Gateway
Introduction
As enterprises evolve and grow, organizations are increasingly operating APIs across multiple environments, such as cloud, on-premises, and edge. In such setups, federated API gateway deployments have emerged as a powerful architectural pattern. This approach separates the control plane from the runtime gateways, enabling centralized API governance while allowing APIs to run closer to users or services for improved performance and resilience.
At the core of this architecture is the idea of:
- Central API Management: One place (like WSO2 API Manager) to define, version, secure, and monitor your APIs.
- Distributed API Gateways: Deploy APIs across multiple runtime gateways, such as cloud-native gateways (like Amazon Web Services (AWS) API Gateway), regional edge nodes, or Kubernetes clusters.
This model not only reduces latency but also enhances availability and operational independence across teams or business units.
Why Federated Gateways?
- Performance: Traffic is routed to the nearest or most optimal gateway.
- Resilience: Failures in one gateway don't affect others.
- Governance: Policies and lifecycle are centrally enforced even across heterogeneous environments.
- Cloud Flexibility: APIs can run on AWS, Azure, on-prem, or in hybrid/multi-cloud setups.
There are multiple ways to implement a federated API architecture. Open source API management solutions like WSO2 API Manager make this pattern more accessible and extensible. In this article, we’ll walk through a practical implementation: how to federate API deployment to AWS API Gateway using WSO2 API Manager. While AWS is the target in this guide, the same approach applies to other environments with appropriate connectors.
WSO2 API Manager as the Control Plane and AWS API Gateway as the Federated Gateway
The AWS API Gateway is a fully managed service that enables developers to create, deploy, manage, and secure APIs at any scale. WSO2 API Manager is pre-packed with an in-built AWS gateway connector and with the use of the connector it is capable of deploying/undeploying APIs created with WSO2 API Manager to AWS API Gateway.
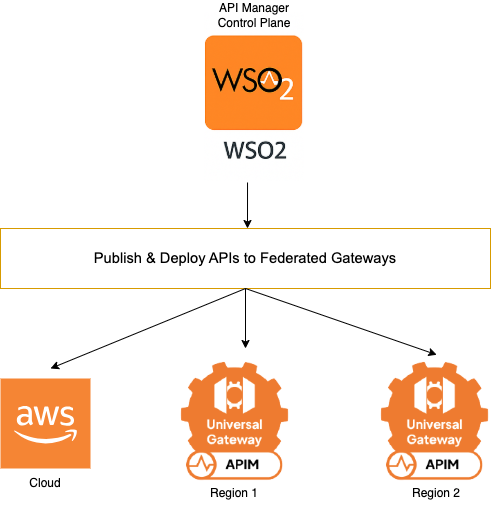
The diagram above illustrates a federated API management architecture where one or more WSO2 API Manager Control Planes can act as the centralized point for designing, publishing, and managing APIs. These APIs are then deployed to multiple federated gateways, including:
- AWS API Gateway (for cloud-based deployment)
- WSO2 Gateways in different regions (for regional or on-prem deployment)
The setup enables centralized governance with distributed execution, improving performance, fault tolerance, and deployment flexibility across hybrid environments.
Let’s look at the step-by-step process of configuring and integrating AWS API Gateway with WSO2 API Manager.
Understanding Identity and Access Management (IAM) in AWS for API Gateway
Within the AWS ecosystem, IAM plays a crucial role in:
- Authorization of API Requests: IAM enables fine-grained control over who can execute specific operations within your APIs. This ensures that only authenticated and authorized entities can invoke the designated API methods.
- Control over API Callers: By utilizing IAM, you can precisely define which users, applications, or services have the permission to call your APIs. This access control is vital for protecting sensitive data and preventing unauthorized usage.
- Management of API Administration: IAM also extends to managing who can configure, deploy, or modify your APIs within AWS API Gateway. This ensures that only authorized personnel have administrative privileges over the API infrastructure.
To facilitate the management and deployment of APIs to AWS API Gateway, it is essential to configure access permissions through the creation and assignment of IAM users or roles within your AWS account. This process involves several key steps:
- Creating a New IAM User: First, you must create a dedicated IAM user specifically for managing and deploying APIs. This user will have its unique credentials and permissions.
- Defining Required Permissions: Next, you need to define the specific permissions that this IAM user will possess. These permissions should be carefully tailored to grant the user only the necessary access to interact with AWS API Gateway. This follows the principle of least privilege, ensuring that the user does not have broader access than required.
- Generating Security Access Keys: Finally, upon creating the IAM user and assigning the required permissions, you will generate security access keys (access key ID and secret access key). These keys are essential for programmatically authenticating the user when deploying or managing APIs through tools like the AWS CLI or SDKs.
Next, let’s see how we can create a new IAM user, define the required permissions, and generate security access keys for API deployment in detail.
Setting Up a User in AWS API Gateway
- Login to your AWS account and navigate to Console Home.
-
Search for “IAM” in the search bar.
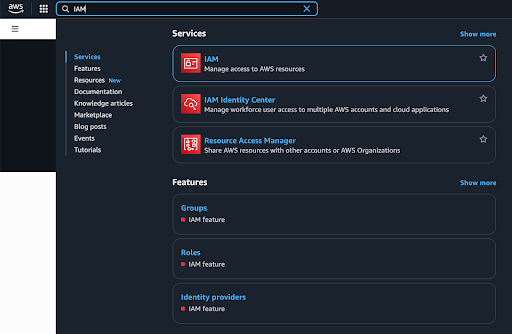
-
Click on the IAM service. Navigate to Users under Access Management.
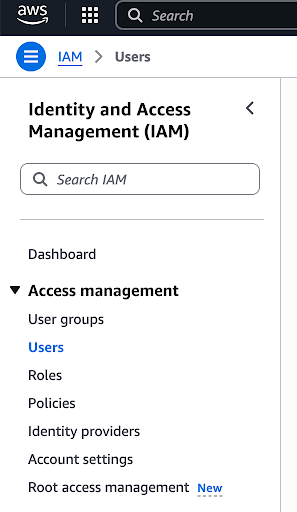
-
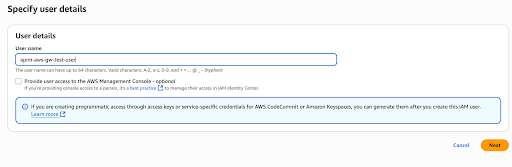
Click Create User and enter a user name.
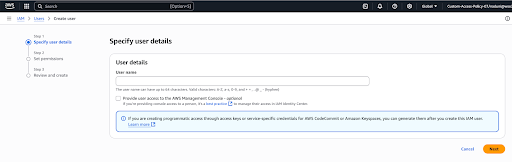
-
Click Next.
-
Select Attach policies directly under the Select Permissions tab.

-
Search for AmazonAPIGatewayAdministrator permission and select it.

-
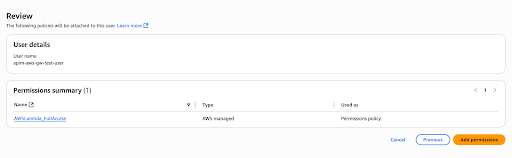
Click Next and then click Create User.
-
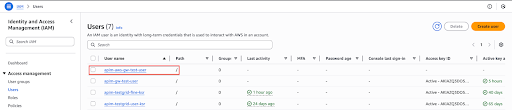
You will be able to see the created user in the list as below.
-
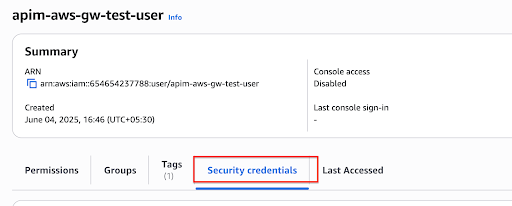
Click on the created user from the list and go to the Security credentials tab.
-
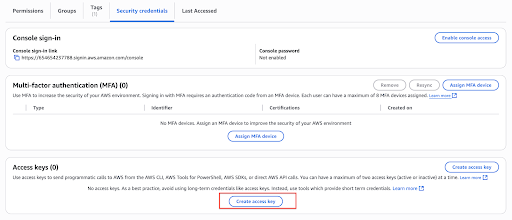
Navigate to the Access Keys and click on Create access key.
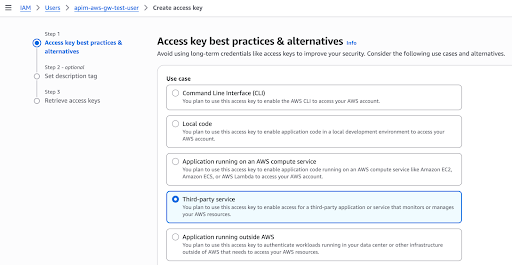
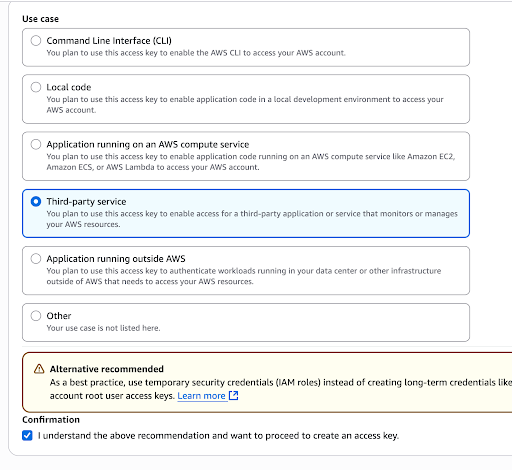
-
Select Third-party service as the use case, tick the confirmation and click Next.
-
Click Create access key and copy the values for Access key and Secret access key for later use.
We will now proceed to register the AWS API Gateway as a federated gateway within WSO2 API Manager.
Register AWS API Gateway as a Federated Gateway in WSO2 API Manager
- Start the WSO2 API Control Plane (ACP) as explained in Single CP for Multiple Gateways.
- Sign in to the Admin Portal via
https://localhost:9444/admin. -
Navigate to the Gateways section and click Add Gateway Environment.
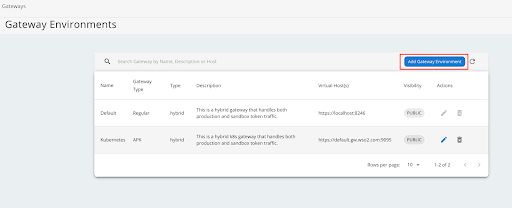
-
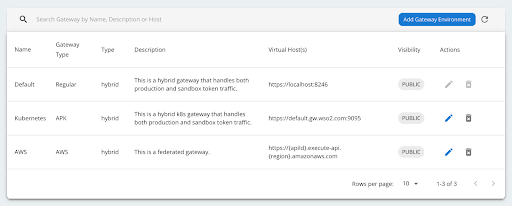
Select the Gateway type as AWS and provide the relevant details in the fields accordingly. Provide the access key and secret access key obtained from the AWS portal in the previous step.
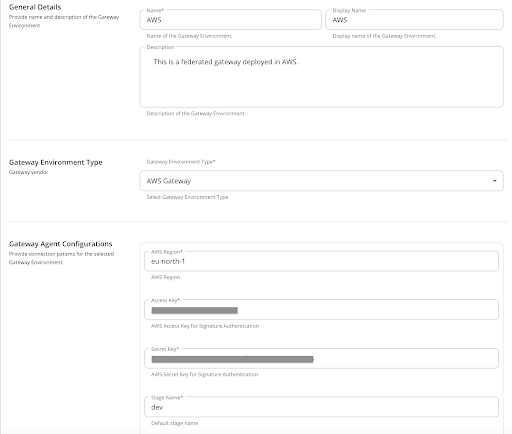
-
Click Add to save the details. The added AWS gateway is displayed as shown below in the gateway environments listing page.
Currently, deploying a Rest API to the AWS gateway is supported by WSO2 API Manager. A sample Rest API with a mock backend will be used for this deployment. Let's proceed to create and deploy an API specifically to the AWS gateway.
For initial verification, we will construct a basic API. Subsequently, we will deploy and publish it to the AWS API Gateway. Finally, we will proceed to invoke the API with security measures to validate the successful integration and functionality of the AWS gateway.
Create and Design a Sample API
- Login to Publisher Portal via
https://localhost:9444/publisher. - Click Create API and then navigate to the Rest API section. Click Start from Scratch.
-
Fill the details as given below and provide a valid endpoint URL. Here a mocky.io generated mock endpoint URL is used.

-
Note AWS Gateway is selected as the gateway type here.
- Click Create & Publish.
-
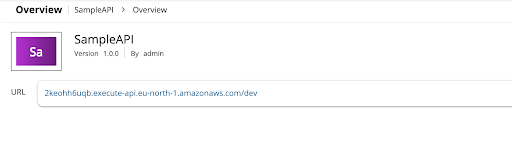
The AWS gateway access URL of the deployed API can be accessed in the Deployments page as below.
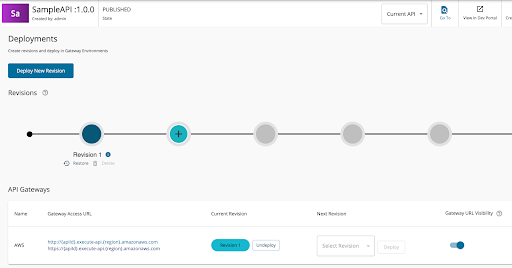
As the next step, let’s do the additional configurations to enable security for the API and then subscribe to it and invoke the API using a valid token.
AWS APIs are secured using AWS OAuth2 policy. When APIs in AWS are secured using OAuth 2.0, it typically involves configuring authorization policies at the level of Amazon API Gateway, Amazon Cognito, or via IAM roles combined with custom authorizers. This tutorial focuses on configuring a security policy using Amazon API Gateway with an OAuth 2.0 Custom Authorizer (Lambda Authorizer).
OAuth 2.0 Security via Lambda Authorizer in AWS
You can implement a Lambda Authorizer to process OAuth 2.0 tokens from external IdPs (like Okta, Auth0, Azure AD). The Lambda Authorizer acts as a gatekeeper in AWS API Gateway. It uses a custom Lambda function to validate incoming OAuth 2.0 bearer tokens, typically JWTs issued by your chosen IdP.
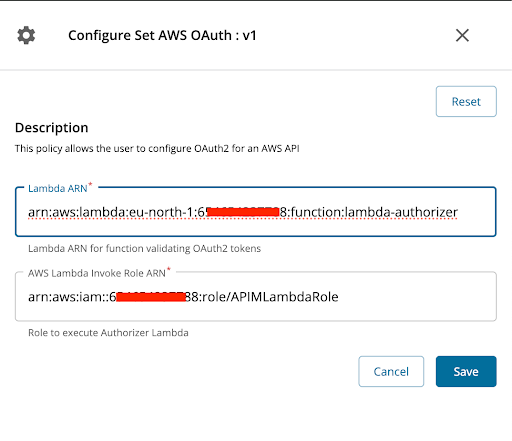
The OAuth 2.0 security policy takes in a Lambda ARN and a Lambda Invoke Role ARN as parameters and this information will be used to configure the Lambda Authorizer at AWS API Gateway.
- A Lambda function ARN: the custom authorizer logic that validates incoming tokens.
- A Lambda Invoke Role ARN: an IAM role that allows API Gateway to invoke the Lambda authorizer.
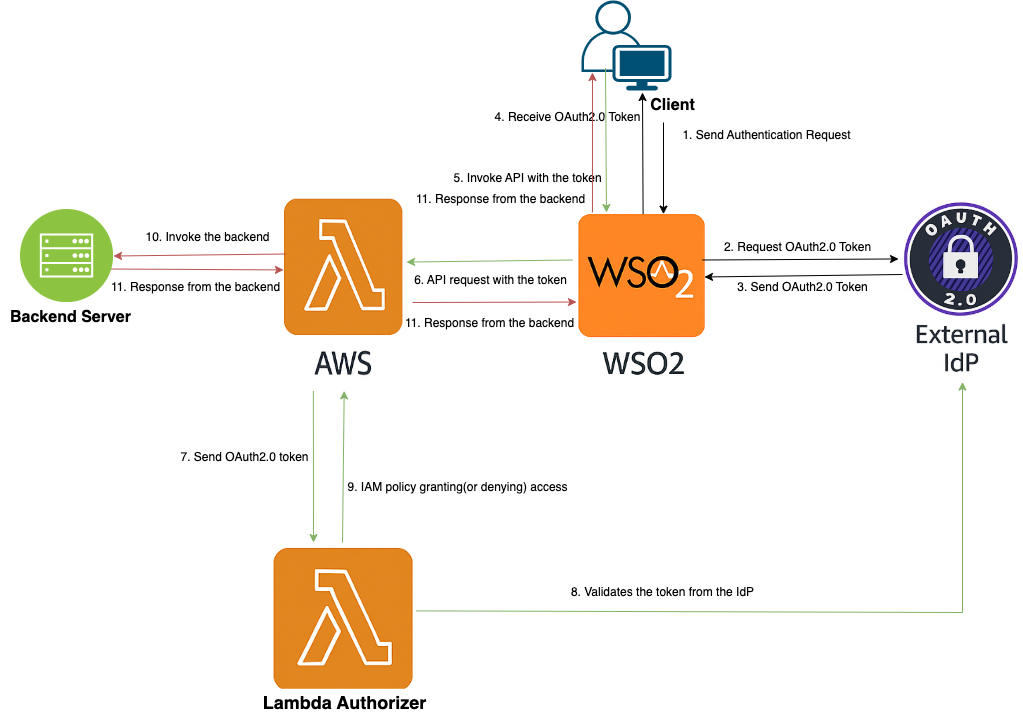
This pattern is used when you're integrating AWS API Gateway with a third-party OAuth 2.0 Identity Provider (IdP) like Okta, Azure AD, Google, or WSO2, rather than Amazon Cognito.
Main steps involved are:
- Client Authentication with IdP: The client (web or mobile app) authenticates with the external IdP using OAuth 2.0 (Authorization Code or Client Credentials Grant) and the IdP issues a JWT access token.
- API Request with Token: The client sends a request including the token in the Authorization header (Bearer token) to API Gateway endpoint.
- API Gateway triggers the Lambda Authorizer to validate the Token: The gateway extracts the token and invokes the Lambda function defined in the policy. The Lambda Invoke Role ARN is used by the gateway to assume permissions to run the authorizer.
- The Lambda validates the Token: The Lambda function parses and validates the token (i.e. checks signature using IdP’s JWKS endpoint, expiry, scopes/aud claims, issuer/iss) and returns an IAM policy granting or denying access.
- Access Granted or Denied: API Gateway uses the returned IAM policy to decide whether to invoke the backend service.
Configure a Third Party Key Manager
In order to enable security for the created API, you need to configure a third party key manager which runs in a cloud environment first.
Follow this guide to configure and setup Auth0 as the third party key manager in the setup.
Configure Security for the API
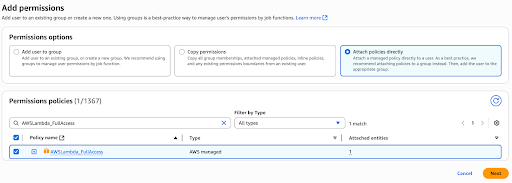
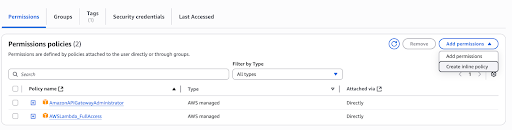
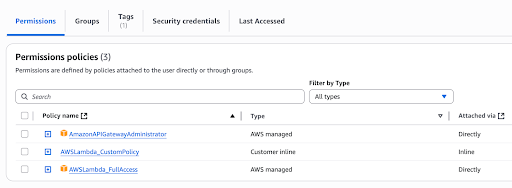
The next steps would require additional permissions to be granted to the IAM user created in Setting Up a User in AWS API Gateway step above.
To grant the required permissions, navigate to IAM -> Users -> apim-aws-gw-test-user -> Permissions and attach AWSLambda_FullAccess permission to the user.
In AWS, sts:AssumeRole is an action that allows a user or service to temporarily acquire permissions associated with an IAM role, effectively granting them the role's permissions. This action is part of the AWS Security Token Service (STS) and is used to obtain temporary security credentials for a specific role. Attach below custom policy to allow sts:AssumeRole action for the user.
Click Add permissions -> Create inline policy.
Select JSON policy editor. Click Next.
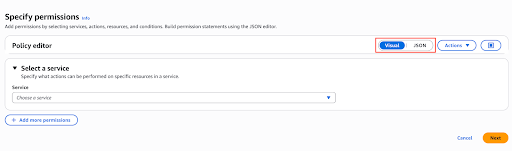
Copy and paste the following policy definition.
{
    "Version": "2012-10-17",
    "Statement": [
        {
        "Sid": "test",
        "Effect": "Allow",
        "Action": [
           "iam:GetRole",
           "iam:PassRole"
        ],
        "Resource": "*"
        }
    ]
}
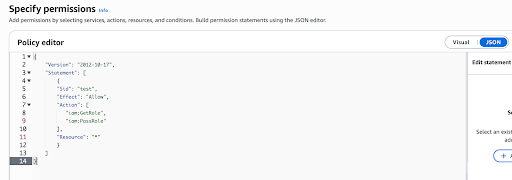
Click Next. Provide AWSLambda_CustomPolicy as the policy name and click Create policy.
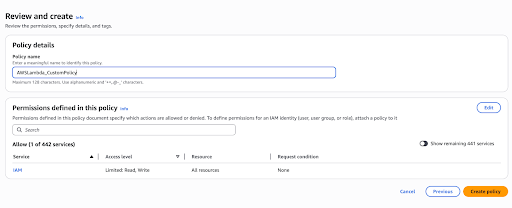
The newly added policy can be seen as shown below.
Configure a Lambda function in AWS to validate tokens generated from the IDP configured in Configure a Third Party Key Manager step. Refer to the sample lambda function implementation at https://github.com/wso2/samples-apim/tree/master/custom-lambda-authorizer. Follow the steps given below to setup and create the function at the AWS side.
- Download and save index.mjs file locally to a lambda-authorizer folder.
- Update the 'jwksUri' field of the key client in the index.mjs file. This should point to the JWKS of the Auth0 IdP (Can be taken from the Certificates section in the Edit view of the Auth0 key manager in the Admin portal).
-
Navigate to the 'lambda-authorizer' folder and execute below commands to install the required node modules.
npm install jsonwebtoken npm install jwks-rsa -
Create a .zip file that contains the contents of your project folder at the root.
zip -r lambda-authorizer.zip . -
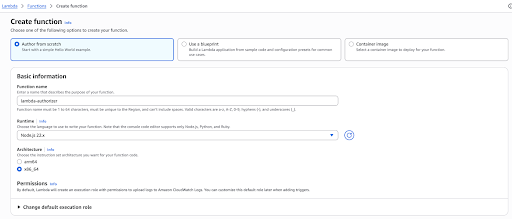
Go to the Functions page of your AWS account and click Create function.
-
Provide the details as given below and click Create function. Provide a function name as required (here lambda-authorizer is used as the function name).
-
Click Upload from and select the .zip file option from the drop down menu.

-
Click Upload and provide the generated zip file above.

-
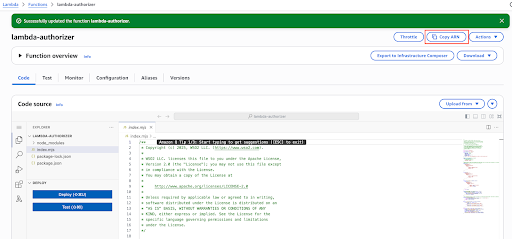
Click Save. Click Deploy to deploy the lambda-authorizer function in the AWS API Gateway.
-
In AWS IAM, configure an execution role for the lambda function. Navigate to IAM > Roles in AWS console and create a new role with below details.
Trusted Entity Type : AWS Service
Use Case : Lambda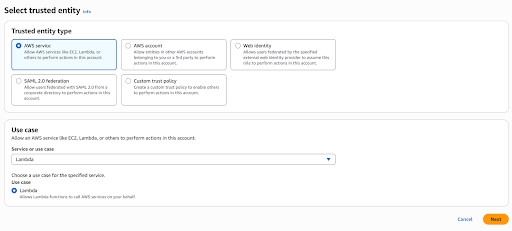
-
Click Next.
-
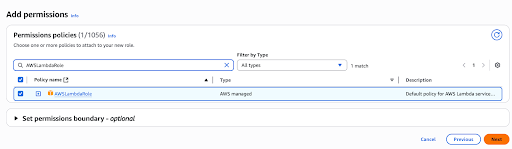
Under the Add Permissions stage attach AWSLambdaRole permission. Optionally attach AWSLambdaBasicExecutionRole if you wish to enable cloudwatch logs for the lambda function.
-
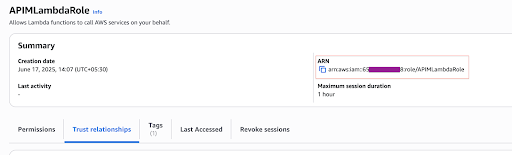
Click Next. Provide a role name (here APIMLambdaRole is used as the role name) and click Create policy. Then edit the Trust Policy as below to allow API Gateway service as well.
{
"Version": "2012-10-17",
"Statement": [
    {
        "Effect": "Allow",
        "Principal": {
            "Service": [
                "lambda.amazonaws.com",
                "apigateway.amazonaws.com"
            ]
        },
        "Action": "sts:AssumeRole"
    }
]
}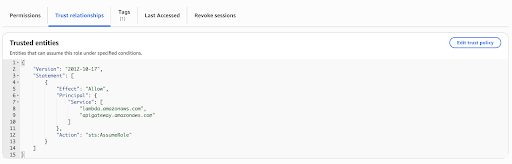
-
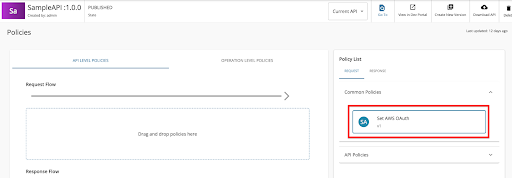
In the WSO2 API Publisher portal, navigate to the Policies section of the SampleAPI created in the above step and move to the API level policies tab.
-
Attach the AWS OAuth policy from the Request policies tab.
-
Obtain the ARN of the Lambda function and the ARN of the execution role created above as below.
-
Provide the ARN values in the AWS OAuth policy, and attach the policy to the API.
-
Click Save and Deploy.
Invoke the Security Enabled API
Now you have deployed the security enabled API to the AWS API Gateway. As the next step, let’s obtain a token from Auth0 and invoke the API via the WSO2 Developer Portal.
For the APIs deployed to the AWS API Gateway, no subscriptions are required.
Login to Developer Portal via https://localhost:9444/devportal and you can see the deployed sample API as below.
You can create a new application from the Developer Portal and generate keys for the Auth0 key manager. Then you can generate a token, copy the token to the clipboard.
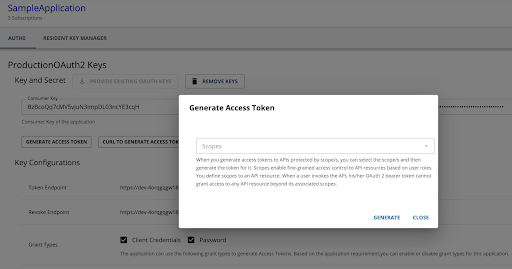
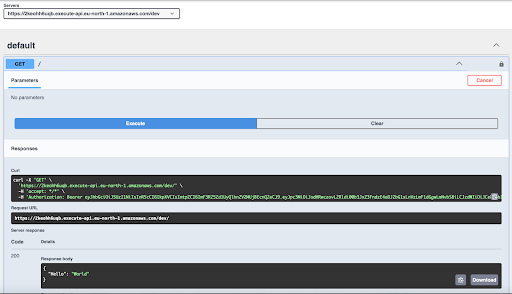
Paste the generated token in the API Console tab of the SampleAPI created above.
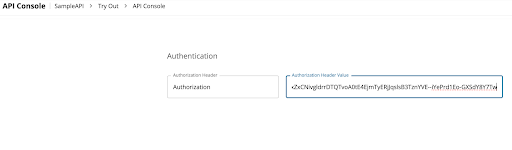
Invoke the API and observe the response.
Conclusion
Deploying APIs to federated gateways in WSO2 enables organizations to operate a distributed, scalable, and policy-compliant API management architecture. Federated gateway deployment promotes agility, fault tolerance, and policy enforcement at scale, making it an ideal approach for modern enterprises with complex API ecosystems. When properly configured, it balances local enforcement with global control, ensuring both operational flexibility and strategic governance.